In this section, I’ll show you what needs to happen as we begin mapping out tasks that need to be completed – this is like places the pieces on the chess board.
Based in Ilkeston, Derbyshire, and serving the Nottingham and Derby area, I provide website services, including development, for small to medium businesses.
1. Set Up Software to Manage Workload
The first thing to do is set up a free Trello account. This is easy-to-use project management software to make everything go smoothly, and to make sure we’re on the same page with the progress of the project.
In layman’s terms, it’s a visual to-do list, with tasks dragged and dropped into lists.
The tasks will organised into columns in this manner:
- 🔮 To do
- 🚧 In Progress
- ✅ Done
I will set up Trello and do all the work here. All that remains is for me to invite you to our private Trello board.

We can still communicate over email, phone, direct messaging, in person etc, but I’ll simply be taking the things we agree upon and placing them in Trello to have everything in one place.
It really is easy to sign up. Make sure you register for the FREE version of Trello.
Trust me, you will sleep better at night knowing all the tasks are organised properly.
2. Set Up a Google Account
Do you have a Gmail address? Then you have a Google account.
Google accounts includes many free tools and services including Google Business profile, Google Drive, Google Analytics 4 and Google Search Console.
If you don’t already have a Google account, please set one up now and make a note of the Gmail address and password.
3. Set up Google Drive
We’ll need to set up Google Drive for the purposes of exchanging large amounts of files.
Email will not be appropriate once we get into the sending/uploading of large files, especially if video clips are involved.
Google Drive is 100% free and offers 15GB of storage. Follow my instructions to create Google drive folders.
Click here to get my Gmail address so that you can give me “Editor” access on the Google Drive folder.
4. Add Passwords to Central Document
For the sake of everything going smoothly, let’s use a document like this one (it’s a Microsoft Word Doc) to keep usernames and passwords organised.
I’ll add the password document to the Google Drive folder.
If any of the passwords ever need to change, they should also be changed in this central password document so there are no headaches down the line.
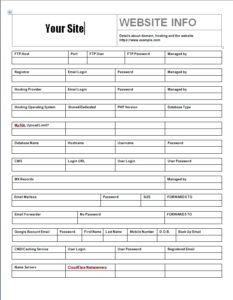
Let’s keep passwords organised
5. Set Up Google Business Profile
A Google Business Profile allows you to list your location on Google maps, collect reviews, set business hours and answer FAQs.
It’s vital for local businesses because in many cases, this will be the first impression people get of your business. Having a Google Business Profile (GBP) helps people find you on Google, especially where local services are concerned.
I’ll need your business operating address. If you’re home-based and want to keep your address private, we can set up an operating area on the Google Business Profile as opposed to a specific address.
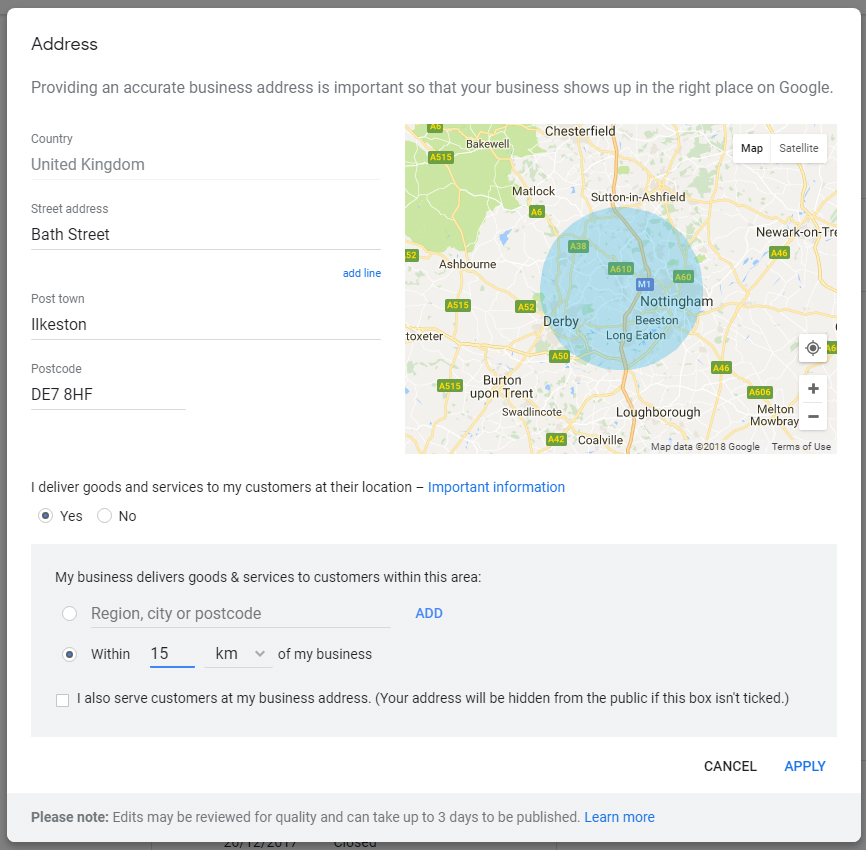
A fully configured GBP listing can make you seriously competitive and integrates nicely with your website. It’s a huge part of the Google search engine, and it’s recommended that we create a process for encouraging people to easily leave reviews.
6. Webhost Selection and Registration
Your website needs somewhere to “live” online. What it needs is a web host.
You may already have one, you might not. If you’re having a website redesigned, this would be a good opportunity to jump ship to a better host.
- If your website is going to serve a local area, traffic is going to be low (relatively speaking) and so shared hosting will be adequate
- Dreamhost is an excellent value web host because they includes lots of extras (email inbox, secure https) which other hosts charge individually for
- Stay away from 123-Reg and GoDaddy for webhosting, although they’re fine for domain registration
You’ll need to sign up to Dreamhost on your own since you’ll be required to supply card payment info. I cannot personally create your Dreamhost account although I’ll need access to it later.
I’ll send you a private video helping you to set up your hosting account
It can take 24 hours for your account to be fully created. You won’t be able to access it during this time. They will email you when your account has been created.
7. Domain Name Selection and Registration
Picking a domain (also known as URL or web address) is easier than you might think. Keep these points in mind:
- Keep it short
- Aim to register a .co.uk or a .com or if you can afford it, both.
- Avoid gimmicks
- Use .org.uk if you’re a charity or community interest company only
Tip: If you’re working from home and cannot let your address be known, use domain privacy where available in the URL registrations process. This is normally an additional annual fee.
8. Security Certificate (https)
There was a time when security certificates were the sole preserve of eCommerce sites (as in taking payments online) but the use of such things now extends to all websites, as advised by Google.
![]()
Security certificates are around £70 a year with hosts like GoDaddy, or free with some webhosts.
Security certificates should be included with your webhost. A free one will be fine. Dreamhost include Let’s Encrypt security certificates for all domains.
9. Newsletter Account Setup
Assuming you want to run an email newsletter, now would be the right time to set up the newsletter account.
What you can do with an email newsletter:
- Broadcast pre-written email messages to a list of subscribers that have opted in to receive them
- Automatically broadcast email alerts to the subscribers when new blog content is published on the site
10. CDN and Other Domain-Related Registrations
A content delivery network (CDN) is something that helps speed up your website load time as well as protect it at the server level.
You can even geo-block other countries using a CDN if you’re absolutely sure you don’t want the entirety of the internet having access to your website.
I’ll be setting you up with a free CDN called Cloudflare for its many amazing features, including those mentioned above.
In a nutshell, Cloudflare will help protect your site from hacking and make it load faster with caching (this is great if you’re on a shared web host).
11. Website Structure, Information Architecture, Pages
It’s a good idea to create a spreadsheet and add the details of each page to it. This is mostly to record SEO titles and SEO descriptions, plus any details of redirects, and whether or not certain pages are indexed.
If you’re working a part of a team (there might be an SEO specialist, for example) having this document accessible on the fly can be helpful.
If you’ve already had a website built and you want to generate the kind of information shown in the video about, you can use free software like Screaming Frog SEO Spider.
Typically, the number of pages and their structure will be more or less like the following:
- Home
- About
- Contact
- FAQ
- Services
- Specific service
- Specific service
- Specific service
- Testimonials/reviews
- Location service area(s)
- Trade body associations/affiliates
-
- Specific trade body associations/affiliates
- Specific trade body associations/affiliates
- Specific trade body associations/affiliates
-
- Insurance/licences
- Terms & conditions
- Privacy policy
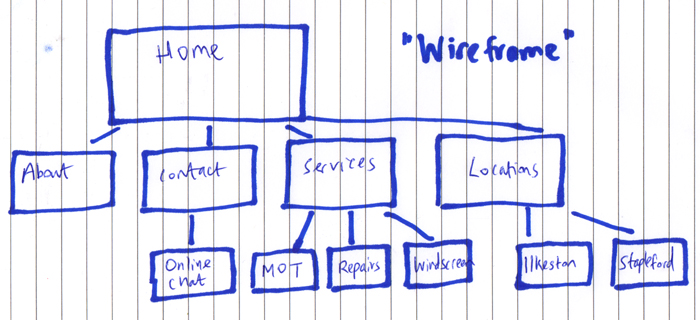
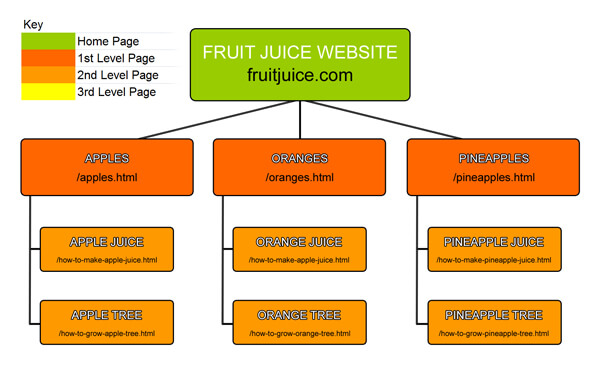
Webpage Parent and Child Structure
In terms of the structure, try to imagine “child” website pages nested under “parent” website pages, rather like a family tree.
The basic idea is to group particular pages together in a logical, topical structure.
Decide on Website Navigation
The web pages will be organised into a navigation bar(s) on the website. A navigation bar is normally along the top of the website, on every page.
Planning an eCommerce Store?
If you’re wanting to build an online shop to sell stuff, things get orders of magnitude more complicated.
The complexity of eCommerce stores requires a detailed product inventory in a spreadsheet if you have hundreds of products, since these will need to be imported using a specialised tool such as the WP All Import plugin.
New Website Guide
Menu
- ⚖️ Quote Submission
- 🗃️ Preparation
- ♟️ Planning
- 📰 Layout
- 🖇️ Content Preparation
- 🧩 Content Integration
- 📐 Design
- 🪛 Technical and Usability
- ⚙️ Putting It Online